

How about a mini pizzetta instead of a pizza? You might be wondering what makes a mini pizzetta so amazing? Well, let me tell you.
Think of a pizza that is so small it can fit in the palm of your hand. Mini pizzetta is exactly what it sounds like! These little fellows taste exactly as delicious big siblings and are like pizza’s charming, tasty younger sisters. For those who want a taste of pizza without committing to an entire pie, they are ideal. Besides that, mini pizzette are also easy to carry around because of their small size.
Despite their petite size, mini pizzette are incredibly tasty and have a texture that is wonderfully crispy. Because they are little, you may top them with a whole variety of your favorite delightful goodies.
Why not play around with some mini pizzette if you’re in the mood for pizza instead of just settling for plain old slices? Mini pizzette, I assure you, will dazzle you and make you chant “Bellissimo” in no time.

Mini pizzetta vs. pizza
Pizza is undoubtedly one of the most comforting and easy-to-wish-for foods out there. It’s so hard to resist the smell of melted cheese, fresh tomato sauce, and a warm, crispy crust. But what if I told you that its miniature version, the mini pizzetta, might actually be even better than the original?
Almost as easy to make as puff pastry pizza tarts, one of the first things you’ll notice about mini pizzettes is how adorable they are. These bite-sized snacks are like little works of art, with perfectly-formed crusts and tiny toppings that are almost too cute to eat. But don’t let their size fool you – the flavourful toppings combined with a crispy crust will leave you wanting more.
The thin crust provides the perfect foundation for a burst of rich tomato sauce, gooey melted cheese, and any toppings you desire. And because they’re small, you can experiment with different flavors and combinations.
Another great thing about mini pizzette is how easy they are to eat. You can hold one in your hand and keep socializing, dancing, messaging or whatever you like with your other hand. And unlike larger slices of pizza, mini pizzette won’t flop over and make a mess.
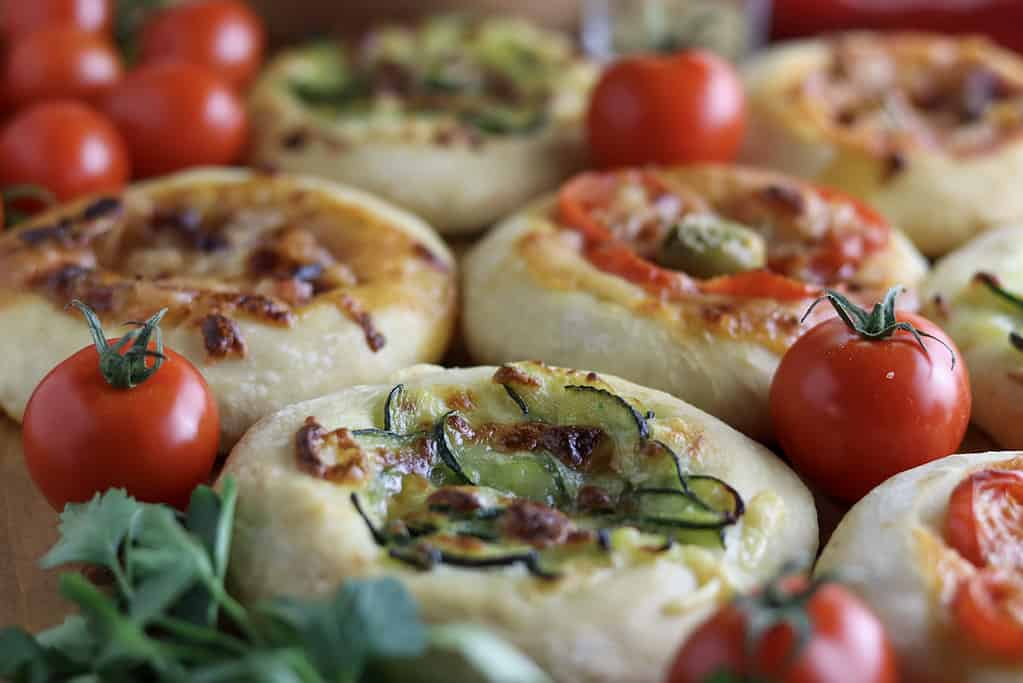
Overall, mini pizzette offer all the same delicious flavors and convenience as traditional pizza but in a cute and more manageable package. They are easier to eat on the go, they are a perfect snack or appetizer for the afternoon party, and the kids will love them because of their easy-to-hold size. This also means no more mess after eating big pizza slices!
Besides that, you can prepare them in advance and freeze them to use when you need a quick, delicious solution, whether that’s 20 mini pizzetta bites for guests that have just surprised you in front of your door or just a few pizza babies for your hungry kid when you don’t have time for cooking.
Ingredients you’ll need
FLOUR – as mentioned below, the type of flour will highly affect the quality of the dough. Therefore, if you can, use the “00” type of flour with low protein content and rich in gluten. If you don’t have “00” flour at home, don’t worry, you can still use other flour, including all-purpose flour, and the pizzettas will still taste good; they’ll just have a different texture. Healthier versions of pizzettas made with wholemeal flour taste just as great as the ones with white flour, sometimes even better.
YEAST – Dry yeast, also known as active dry yeast, is typically sold in the form of granules, and it’s easier to use than classic fresh yeast. Mini pizzette made using active dry yeast have a better texture and structure because the dough rises more evenly. In addition to being more practical to have on hand, active dried yeast has a longer shelf life and can even be stored longer in the refrigerator or in the freezer.
OLIVE OIL – Olive oil is an irreplaceable ingredient that will make your mini pizzette taste incomparably better. You will use some of it for making the dough and the rest for the toppings. We highly recommend you stock up on organic cold-pressed olive oil, as the taste of a good oil makes such a huge difference to the flavor of any food you’re preparing.
SALT & SUGAR – You will need a teaspoon of fine salt and a teaspoon of sugar for the dough.
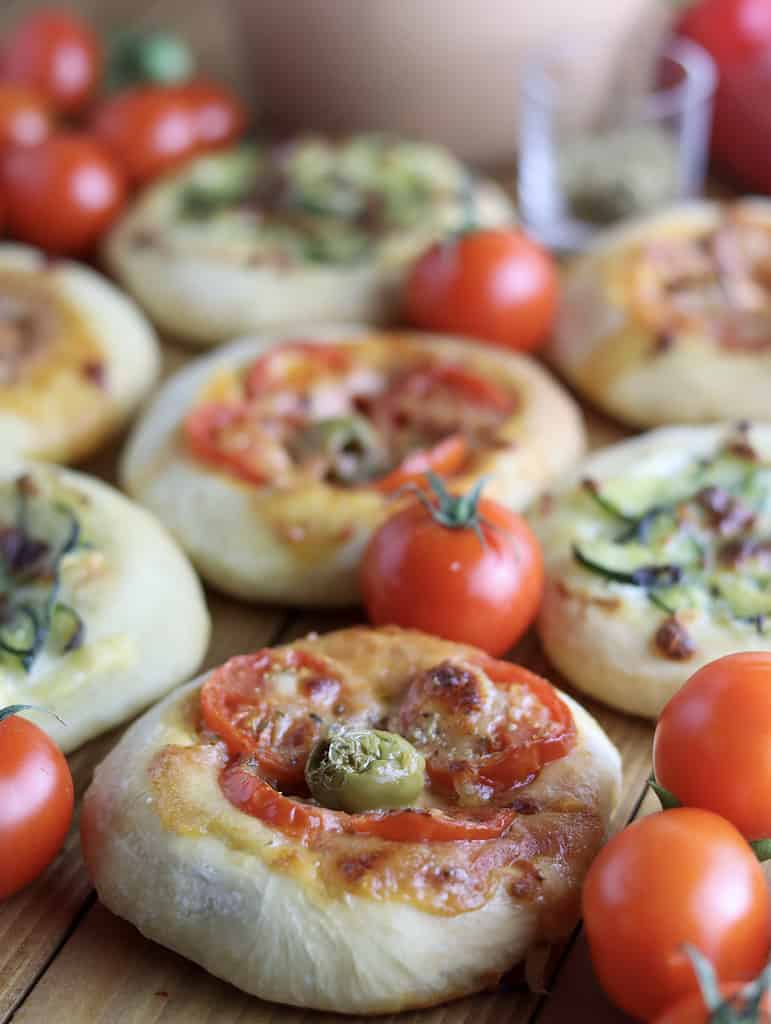
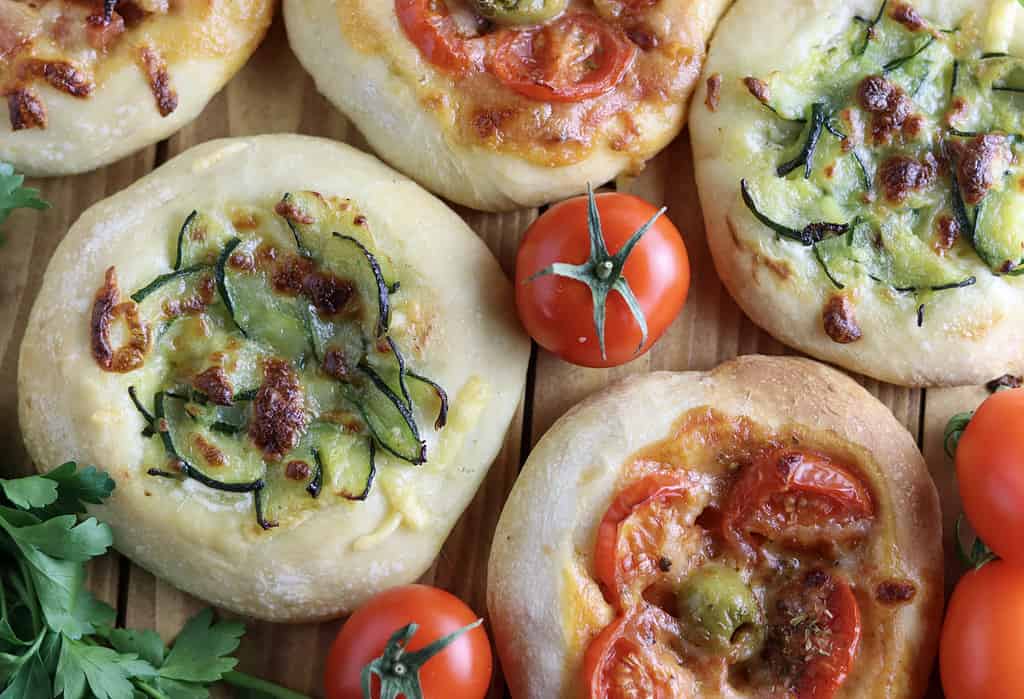
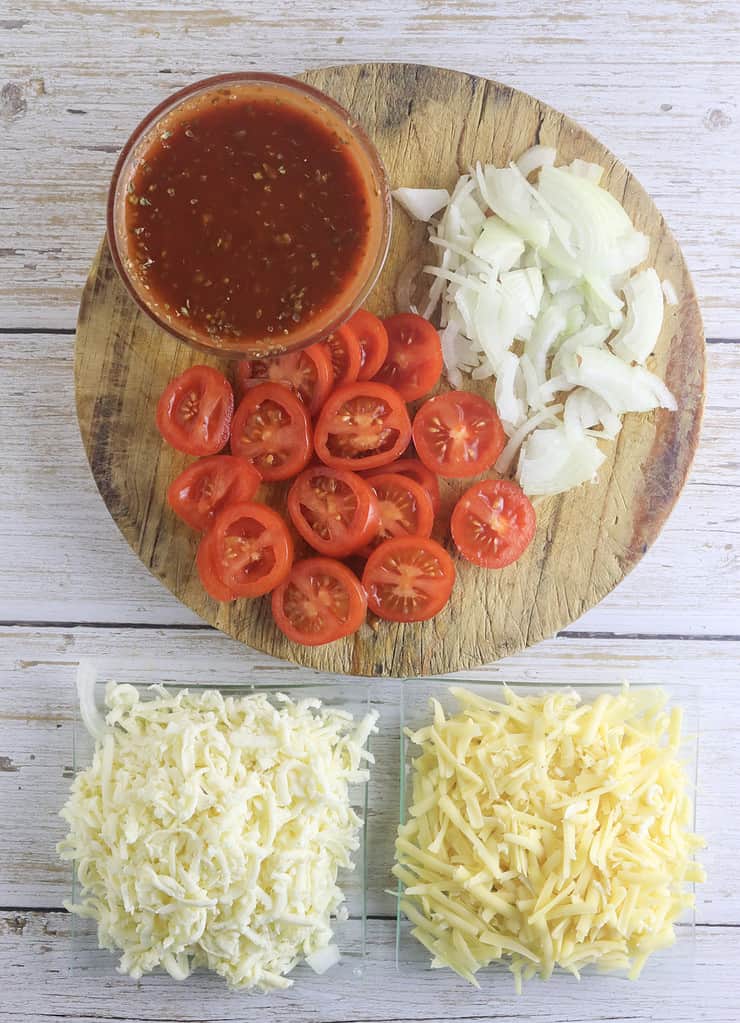
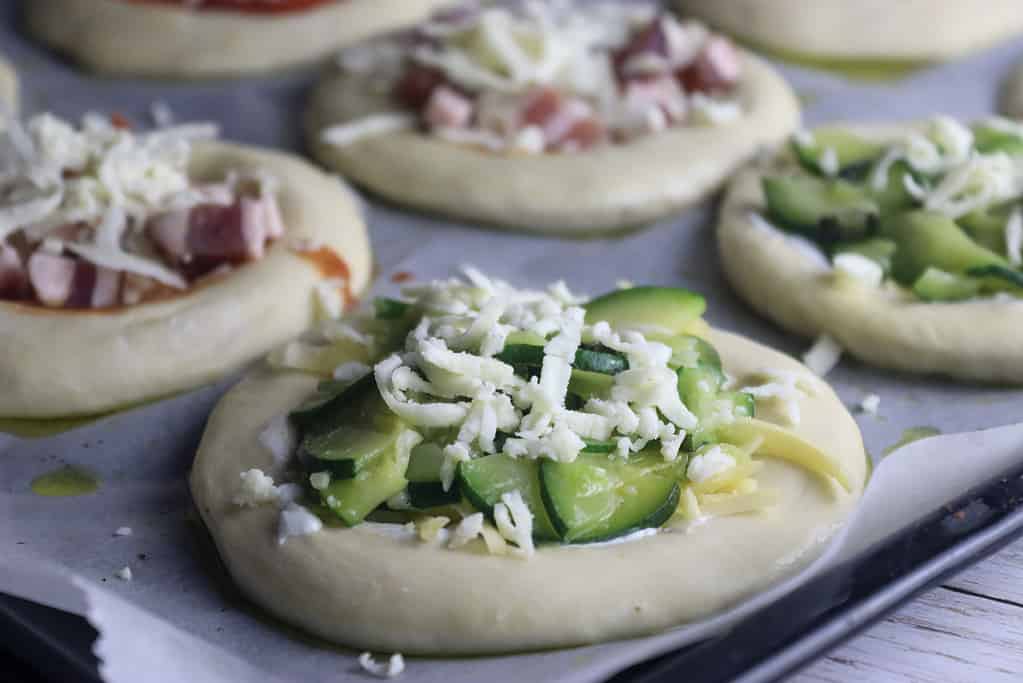
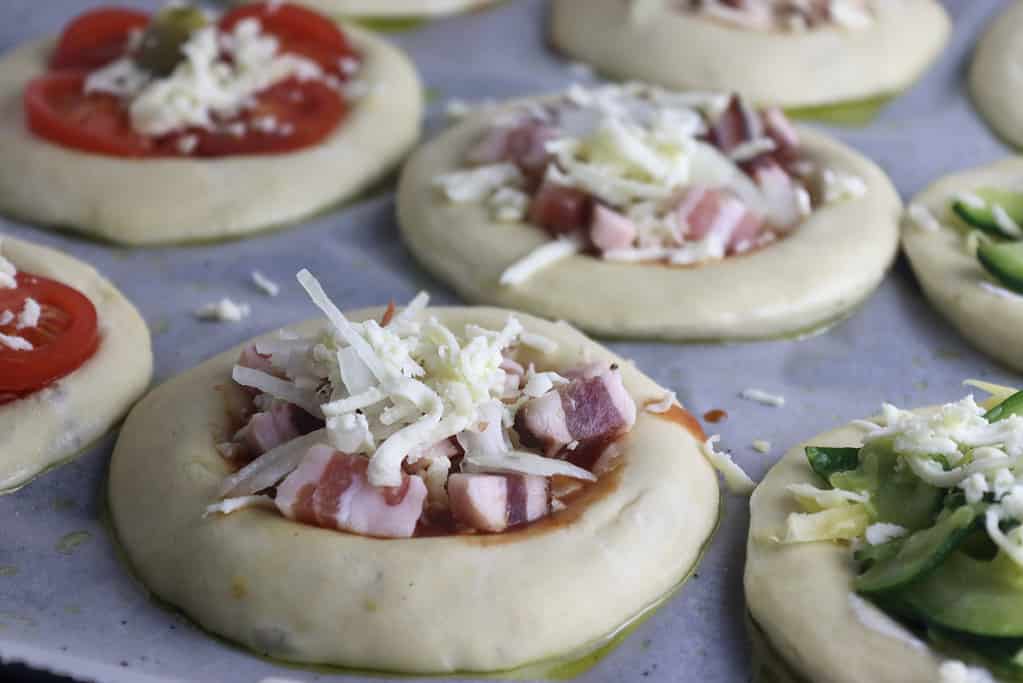
PIZZA TOPPINGS – Spice things up and experiment with different favorite toppings for mini pizzette! In this recipe, we made three different kinds of toppings.
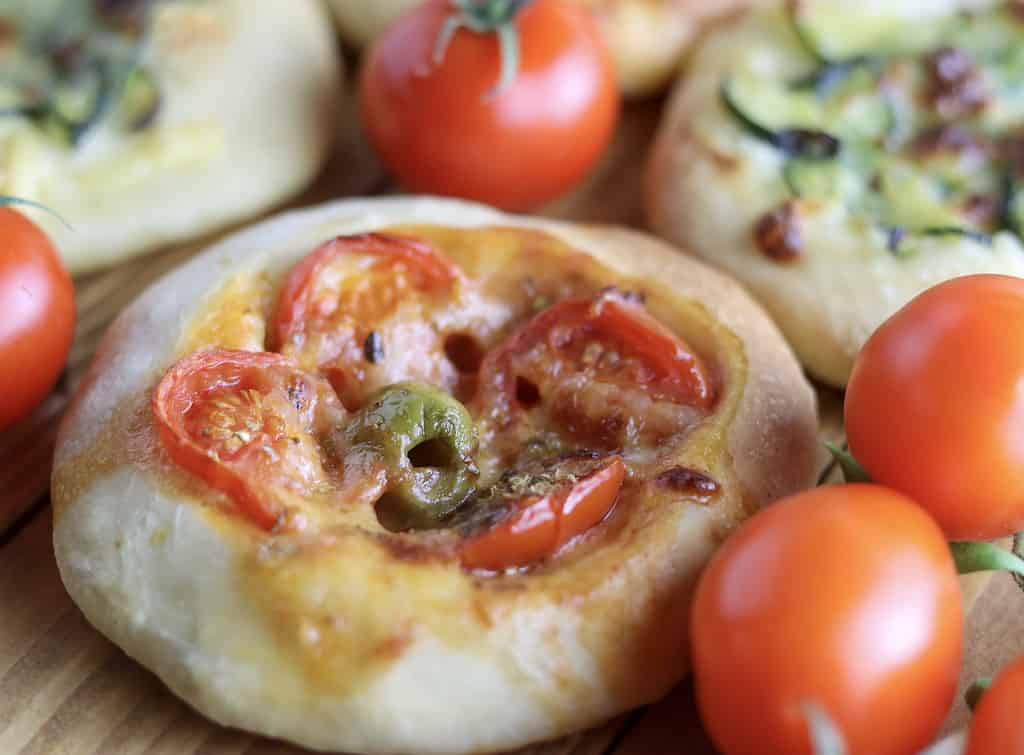
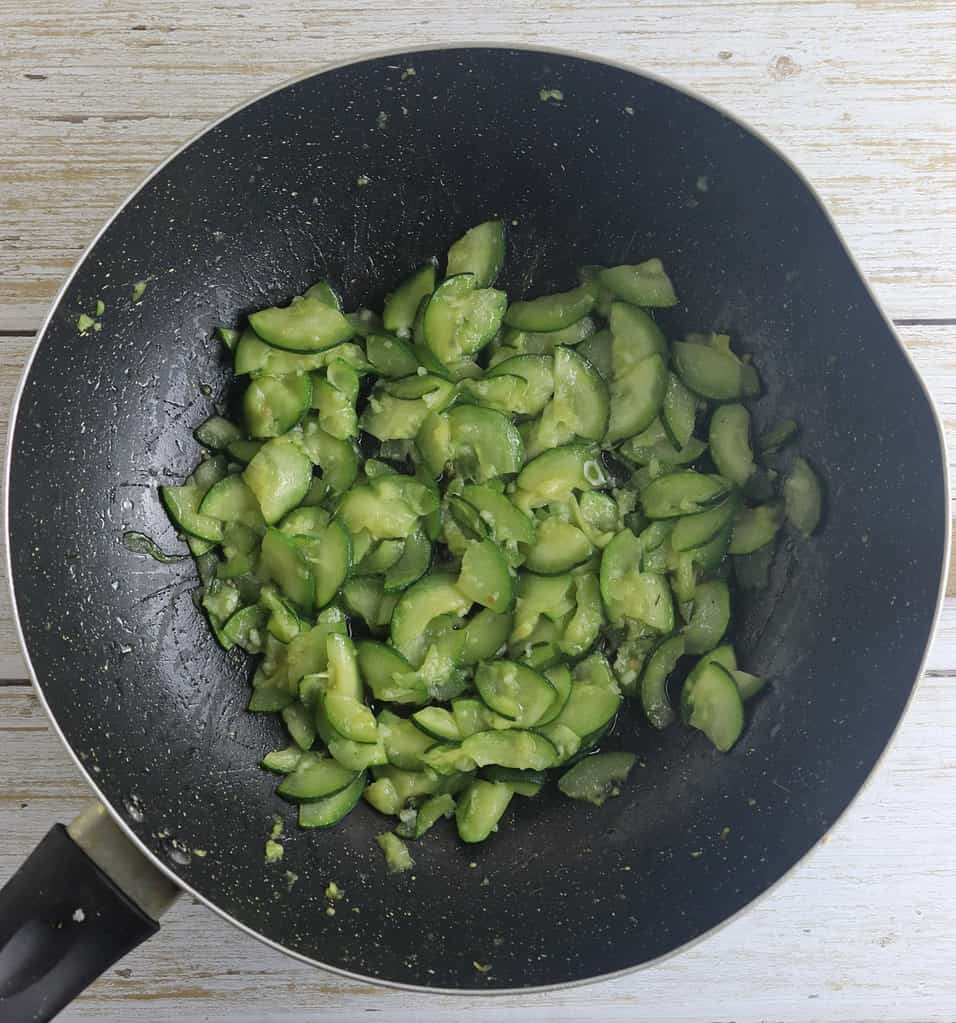
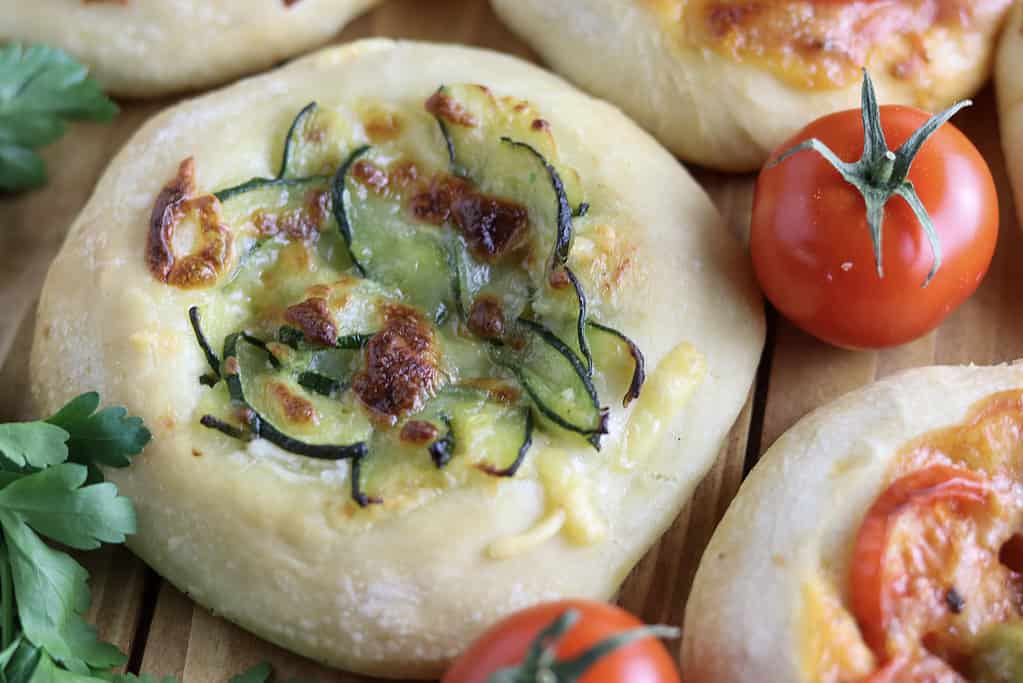
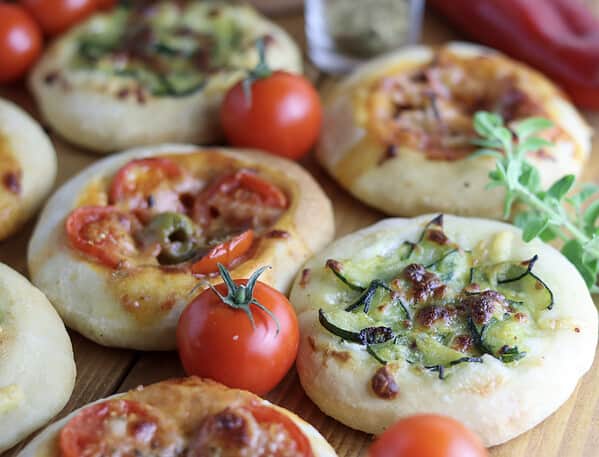
The first one (the Margherita variation) was made from tomato sauce, oregano, cheese, fresh tomatoes and olives. The second, the bacon variation, included tomato sauce, oregano, cheese mixture, onions and small pieces of bacon. The third, the zucchini variation, is my favorite. It’s made with sour cream, fried zucchini pieces and lots of garlic.
Our advice? Use whatever you got in the fridge or in the garden, and use your imagination! The only thing you can’t make the pizza without is the cheese.
Remember, if you want that creamy, stretchy, and gooey consistency of the pizzette, adding MOZZARELLA CHEESE is almost crucial. It will give the little pizzas their desirable texture and cheesiness. It holds the ingredients together when it melts, preventing them from sliding off or becoming too loose.
When you take a slice of pizza with melted mozzarella, that will give you the most desired sensation of long cheese strands stretching from the slice to your mouth.

The perfect mini pizzetta dough
What holds true for good pizza dough is well worth remembering for the mini pizzetta dough as well.
When choosing the flour, it’s important to choose a good one as it will affect the texture, taste and even the color of mini pizzette. While it’s completely possible to make mini pizzettas with any kind of flour, choosing quality flour will definitely make a difference when preparing the dough.
The best flour type for mini pizzettas is the 00-type flour which is extremely fine ground with low contents of protein. That ensures a soft and light dough with a gentle taste. If you don’t have it, you can use a mix of type 1 and type 0 flour or whole meal flour for more rustical mini pizzette. Strong flour contains more gluten than all-purpose flour which makes the dough rise with a better structure.
The longer you leave your dough to rise, the better it gets. By letting the dough rise slowly overnight in the fridge, the yeast has more time to ferment and develop, resulting in a richer, more complex flavor. This slow fermentation process, when the dough rises to a double volume, also makes the dough easier to digest and gives it a better texture, with a crispy crust and a chewy interior.

Besides that, raising the dough overnight will ensure that assembling the pizzettas will be easier. A longer risen dough is easier to stretch and shape, which means you’ll be able to create the ideal mini pizzettas shape and thickness.
Have you ever wondered why you couldn’t make perfect pizza dough? You’ve probably heard of a few basic ingredients like flour, water, salt and yeast, but did you know the one ingredient that might completely change your mini pizzettas? I’m talking about olive oil.
Adding a few tablespoons of olive oil to the dough will provide a tastier and crispier crust on mini pizzette. It helps the dough to stay soft while keeping it moist, which allows it to form and stretch better. Moreover, the oil helps to improve the texture by making the dough airier.
Quick and easy mini pizzetta recipe
PREPARE THE DOUGH
STEP 1: In a bowl big enough, mix together the dry ingredients, the flour, dry yeast, a teaspoon of salt and a teaspoon of sugar.
Make sure that you don’t exaggerate with the salt. Excessive salt can hurt yeast activity. Salt draws out moisture from the yeast cells, dehydrating them and hindering their ability to metabolize and produce carbon dioxide gas, which is essential for the dough to rise.

STEP 2: Warm a cup and a half of water to a few degrees higher than room temperature and add it to the bowl together with three tablespoons of olive oil. Stir it all together from the middle to the outer part of the bowl until you get a soft, wet and somewhat sticky dough.

STEP 3: Sprinkle a clean, flat surface with a handful of the remaining flour. Reload the dough from the bowl to the sprinkled surface and knead it with your hands for at least 10 minutes. Lift the dough and clap it against the surface several times.
Repeat as long as the dough doesn’t become supple, soft and stretchy. If needed, add a small amount of additional flour to prevent the dough from sticking to the surface.
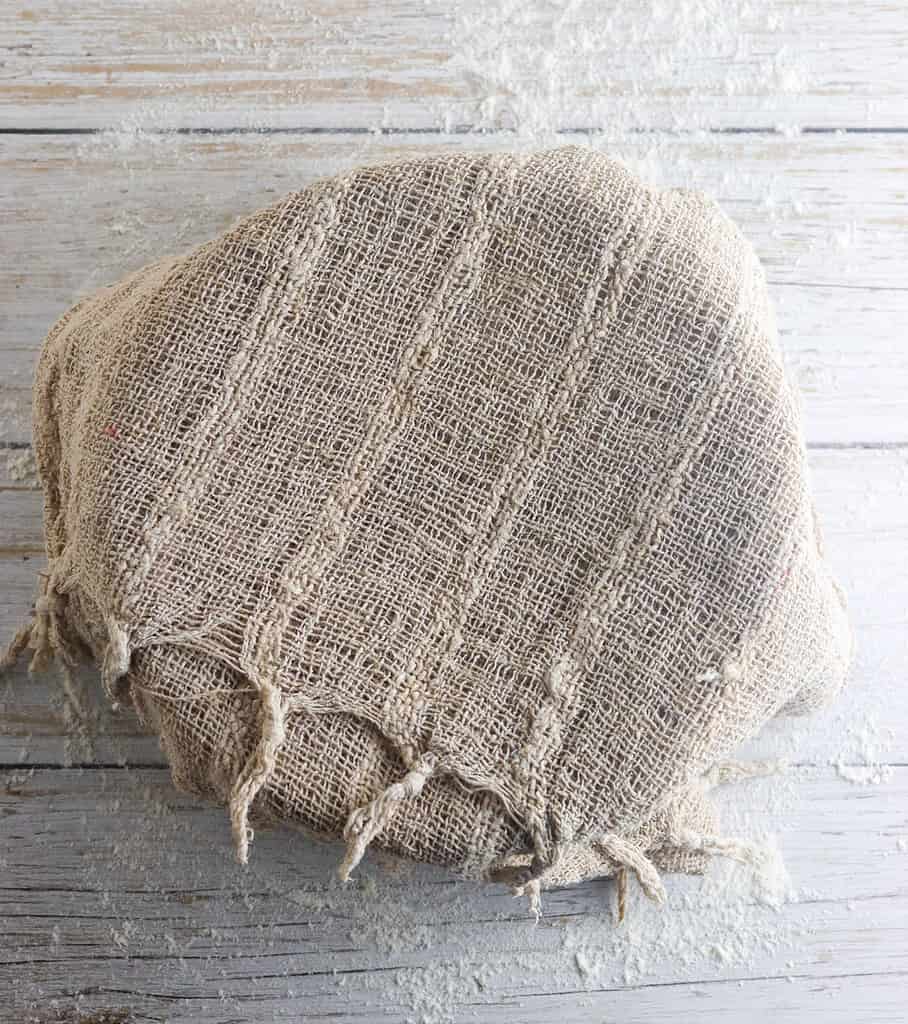
STEP 4: When finished, sprinkle the same bowl with flour again and let the dough rest in the bowl covered with a clean cloth or napkin at room temperature until it doubles in size.
It’s important to remember that the dough needs a stable and warm temperature in a draft-free environment to rise. This allows for consistent fermentation and proper yeast activity, enabling the dough to rise evenly and achieve the desired texture and structure.
If you are preparing the dough in advance, let it rest overnight in the refrigerator.
MINI PIZZETTE IN THE MAKING
STEP 5: Preheat the oven to 450°F/230°C.
While you are waiting for the dough to rest and rise, you can prepare the toppings.
Shred the cheese and mozzarella using a shredder, and cut the onions, garlic and vegetables you’ll use to top up your mini pizzas. If you’re not using premade pizza sauce, mix tomato sauce in a small bowl together with a pinch of salt, oregano and/or small pieces of garlic.
If you decide to make the zucchini variation as well, cut zucchini into small pieces, add a pinch of salt, and quickly stir-fry them in hot olive oil.
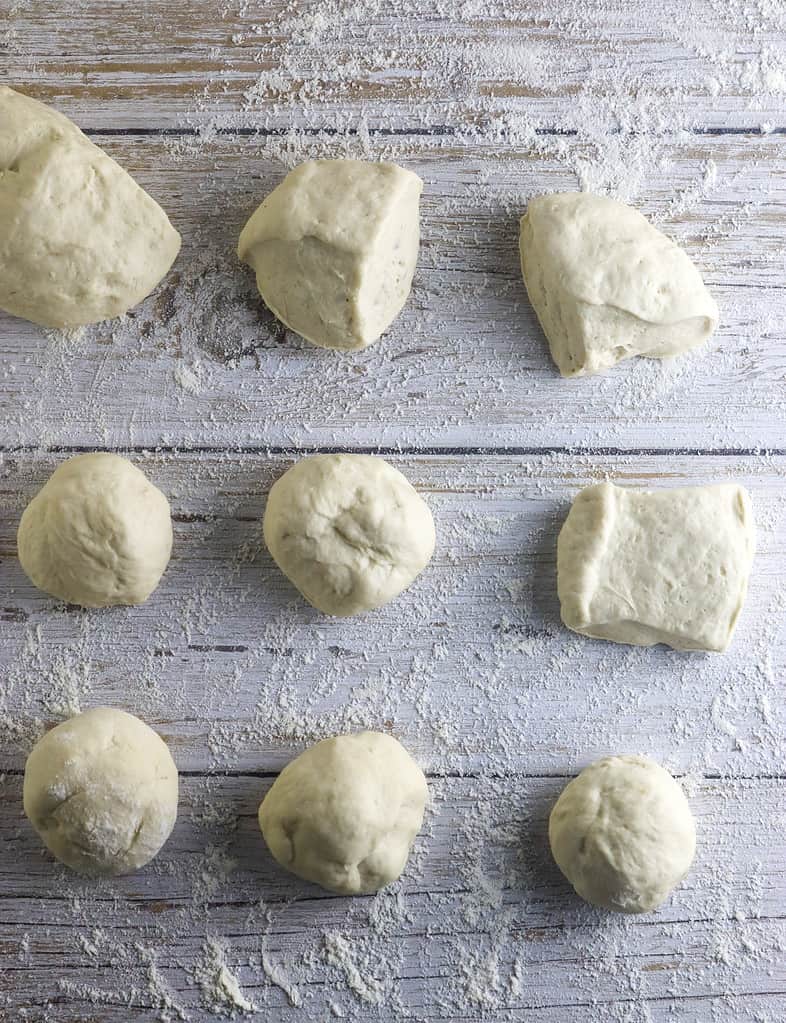
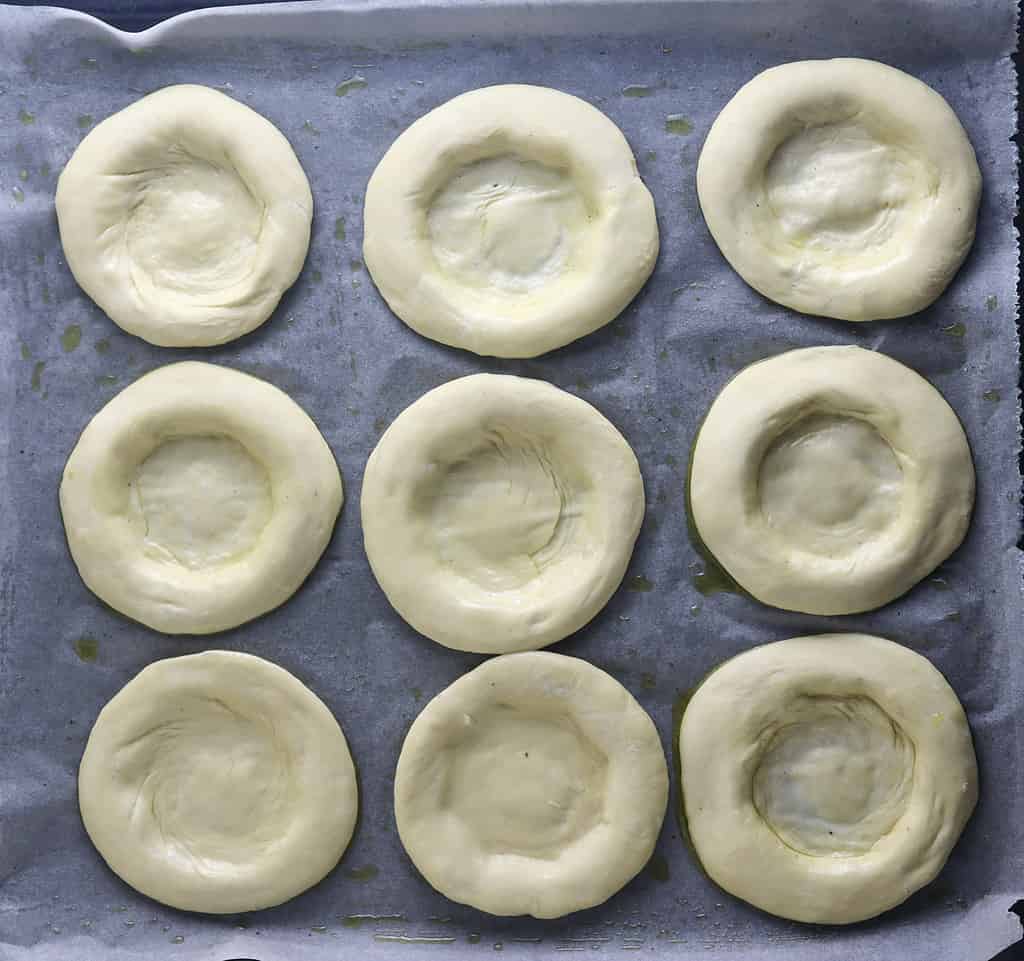
STEP 5: When the dough has doubled in size, gently knead it on a flour-sprinkled surface, split it into 9-12 same-size pieces, and form the dough balls.
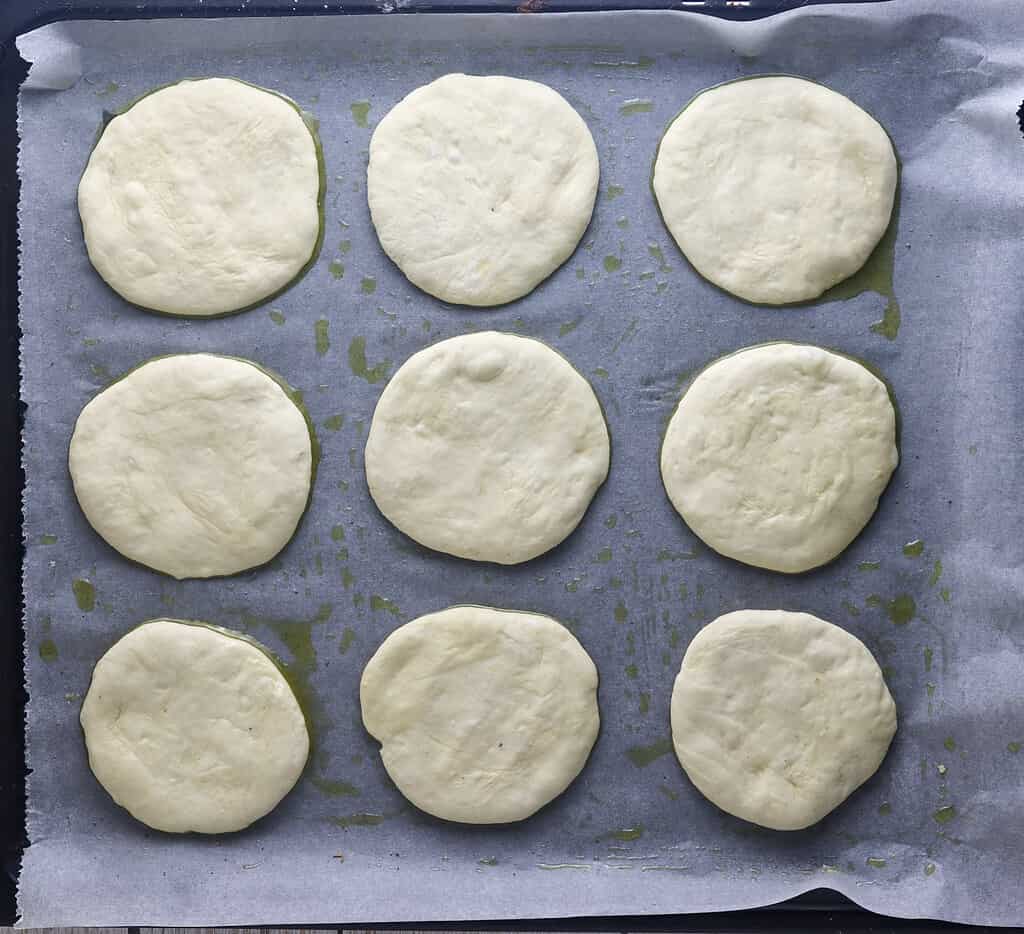
Using a rolling pin (or just hands), press the balls to the surface to form round patches about 10 cm wide in diameter. These will be your mini pizzette!
Prepare a baking sheet with parchment paper and sprinkle it with olive oil. Gently transfer the dough to the sheet. Cover it again and let it rest in a warm place for another 15 minutes.
STEP 6: When the dough has risen a little, cover it with olive oil using a kitchen brush.
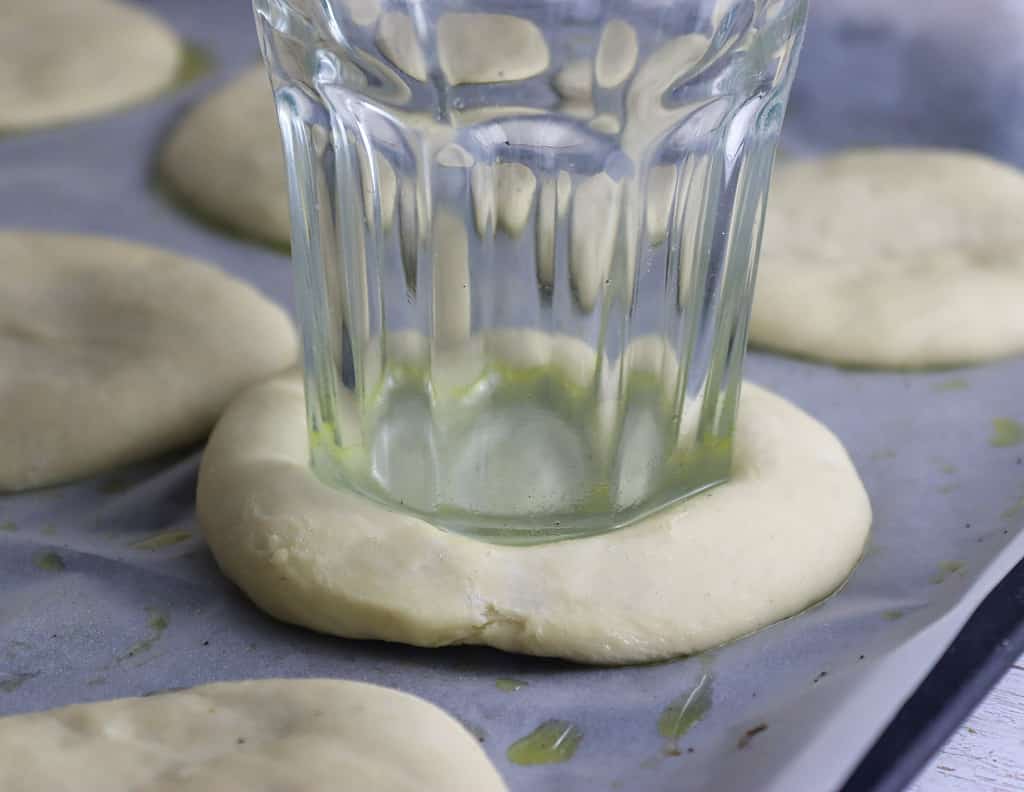
Now press the middle of each mini pizzetta with a glass. You can turn the glass in circles, but be careful not to break the dough in the middle. This little trick will make it easier to form your pizzette’s fluffy and crusty edges, and you’ll be able to top each mini pizzetta with much more toppings.
It will make the little pizzas much tastier and mouth-watering and prevent the toppings from leaking over the edges while they are baking.
STEP 7: Top up each mini pizzetta with your favorite toppings you prepared in advance. We first used tomato sauce and sour cream and then generously filled the middle with a mixture of shredded cheese and mozzarella and topped it with zucchini, pieces of bacon, fresh tomatoes, olives and garlic.
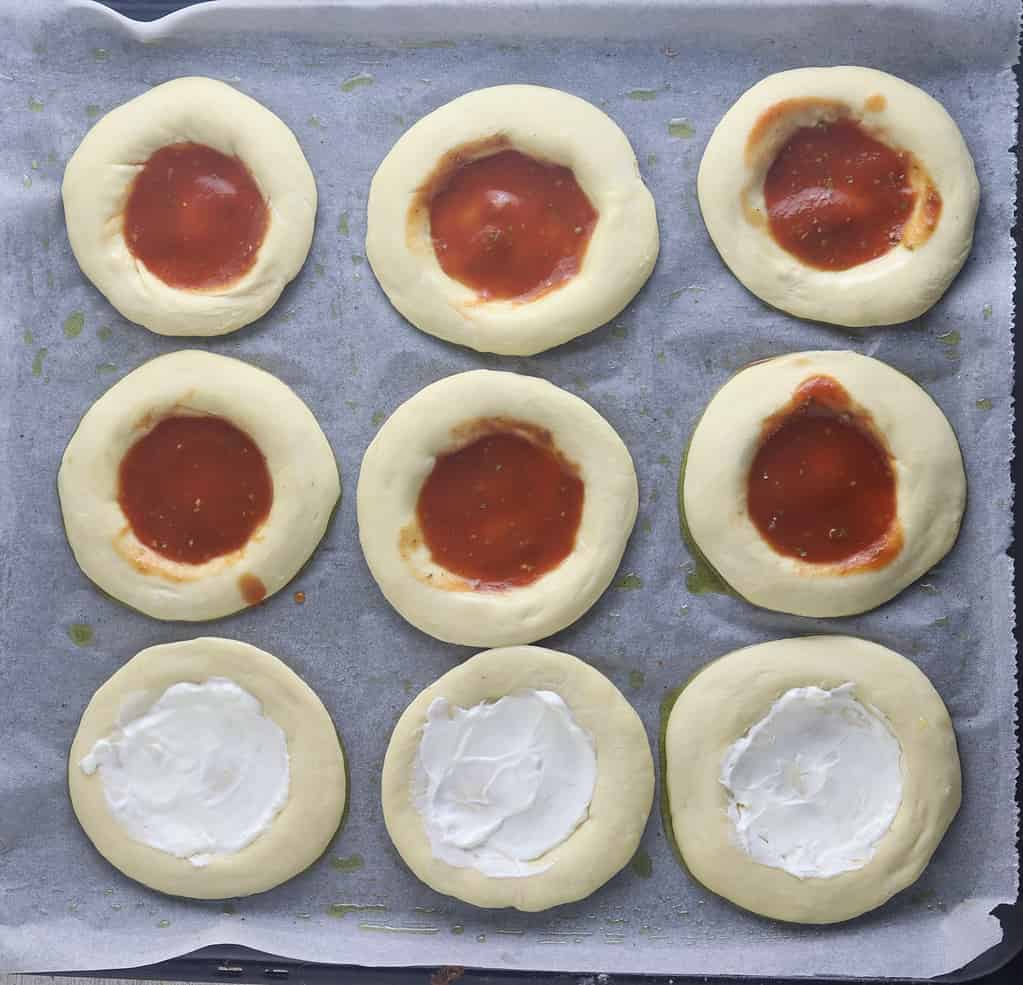
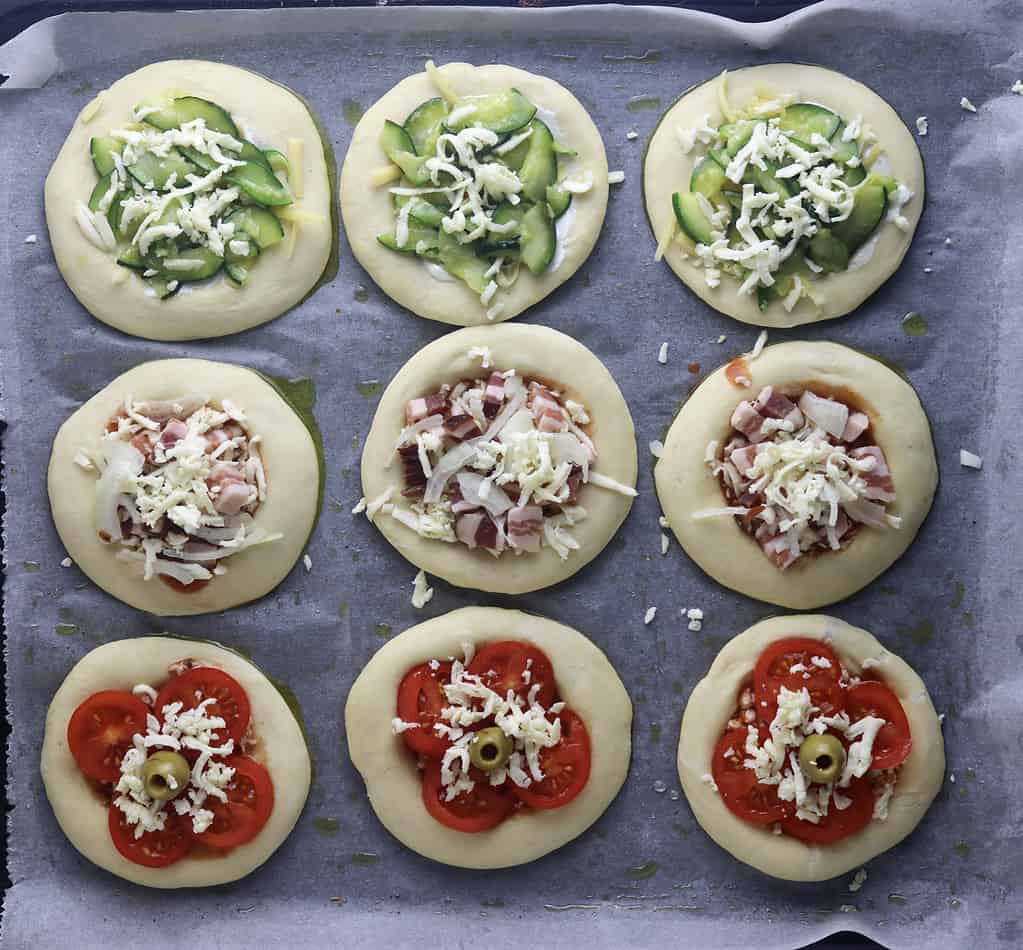
We sprinkled them with a small amount of shredded mozzarella over the top.
STEP 8: Bake at 230 °C/450 F for about 15 minutes until every mini pizzetta gets a yummy-looking crust.
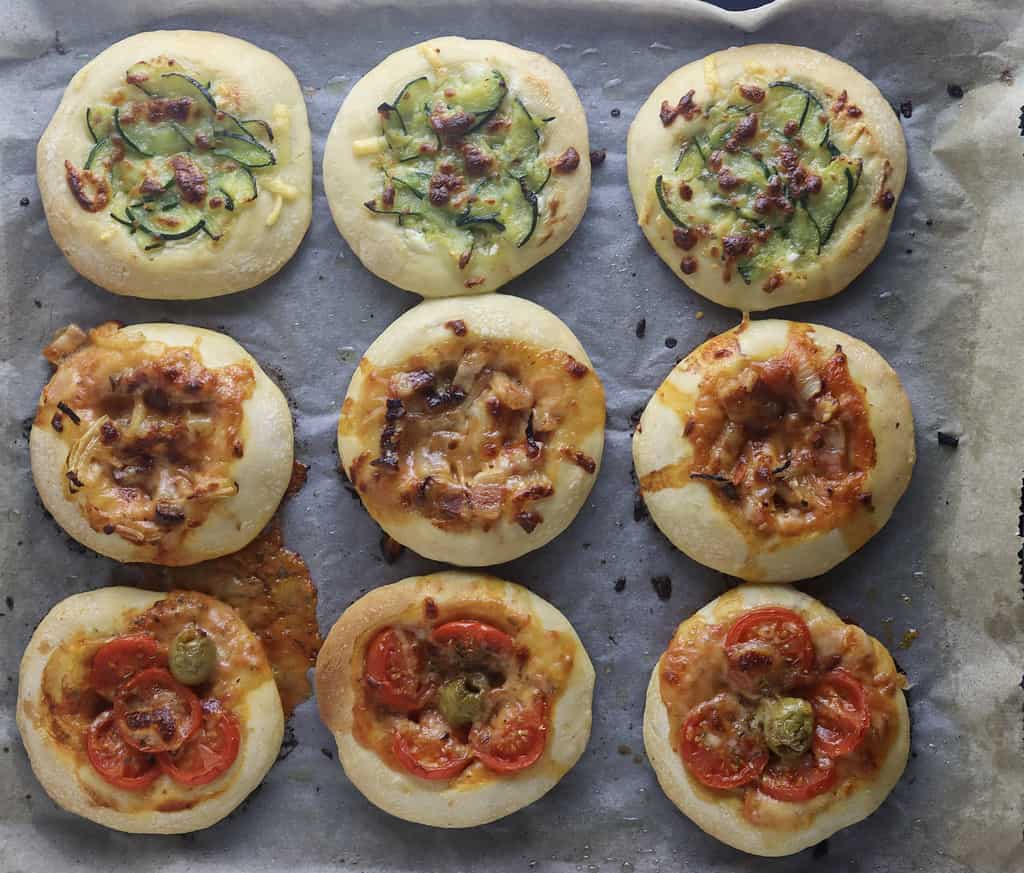
Check the mini pizzette periodically during the baking process. The cheese should be melted and bubbly. The exact baking time may vary, so it’s important to keep an eye on them to prevent overcooking or undercooking.
Food nutter’s tips for a tasty mini pizzetta snack
The art of the dough involves carefully mixing all the ingredients and then gently coaxing the mixture into a dough that has the potential to be both soft and elastic. Knead gently, aiming for a consistency that will produce a sensitive chewiness as well as a crisp exterior.
If the dough is too dry, add a little more water and if it gets too wet, add more flour. A properly kneaded dough is elastic and does not stick to the hands.
The longer the dough rests, the better it will get; the best mini pizzetta is made with the dough that has been resting in the refrigerator overnight.
Experience the flavorful sensations of a wide variety of sauces. Allow the aromas to dance harmoniously as you simmer luscious tomatoes with aromatic herbs and spices. Curiously try several flavors and variations until you find the ones that suit you best. For instance, these little pizzas taste like a dream when topped with pistachio pesto!
Explore several toppings. Arrange them carefully, trying out new configurations to see what’s your favorite and what works best. You might want to eat them with our pistachio pesto or dip your nose into our pizza with porcini mushrooms?
Preheat your oven to an optimal temperature, aiming for a balance between gentle heat and a potential fiery blaze. Most pizzas bake well at 500F or 250C, but because mini pizzette are smaller, 45oF/250C is just enough. Place your mini pizzetta snacks on a preheated stone or baking sheet to ease up the baking process.
Storage
Mini pizzette should be allowed to cool at room temperature for 15 to 20 minutes before being stored. As a result, condensation shouldn’t form.
Choose a container that seals well, or wrap the pizza pieces tightly in plastic wrap or foil. Mini pizzette will last longer and smell better when stored in an airtight container.
Divide each mini pizzetta with parchment paper, wax paper or paper towels to separate mini pizzette stored in the same container. This makes it easy to remove individual mini pizzetta after reheating, and it keeps them from sticking together.
You can store the container or wrapped pizzette in the fridge for up to two days. Little pizzas will last longer in the fridge since the chilly temperature inhibits the growth of bacteria.
Use your best judgment when judging if the pizzette you saved for later are still edible. You should toss them out if they have an off odor or mold.

You may reheat them by preheating the oven to 180 degrees Celsius (around 350 degrees Fahrenheit). Whether using a baking sheet or a rack, set the pizzette in the oven. The crust’s crispiness is often restored after being reheated in the oven. To heat the crust and melt the cheese, microwave for 5-10 minutes.
The best way to prepare mini pizzette in advance is to freeze the dough. Prepare the dough by following the first part of the recipe, then freeze the dough balls separately. The dough can be stored in the freezer for up to 3 months.
When you are ready to make delicious mini pizzetta snacks, thaw the dough at room temperature, let it rise and form the mini pizzette, top them up with your favorite toppings and enjoy them hot and fresh!
Mini pizzetta FAQs
Mini pizzette are smaller than traditional pizzas; mini pizzetta can range from 4 cm to 10 cm in diameter. They’re more manageable and can be eaten in one or two bites, making them ideal for single servings or sharing. They also allow you to try out new flavors and condiments.
Mini pizzette can be topped with anything. Cheese, pepperoni, mushrooms, olives, onions, bell peppers, and the traditional margherita toppings of tomato sauce, mozzarella, and basil are all popular choices among pizza fans. You may put whatever you like on it, so feel free to get creative.
Yes, mini pizzette can be frozen. Once they have cooled, wrap them tightly in plastic wrap or a freezer-safe container and store them in the freezer for up to two months. They may be reheated easily by defrosting in the fridge overnight and then baked at a low temperature until hot.
Absolutely! Miniature pizzas, or pizzette, are just great for social events. They’re flexible, tasty, and simple to prepare for a wide range of palates and nutritional needs. They’re perfect for sharing as an appetizer or as finger food. Kids will love them; they can hold them in their hands much easier than regular pizza bites.
Using premade pizza dough from the shop is a time-saving option for creating mini pizzette. You can find it in almost any grocery store’s frozen or refrigerator department. Just thaw the dough, roll it out to the desired size, top it up with your favorite toppings and bake as usual.
Food nutter’s snacks you may like
Focaccia with sun-dried tomatoes
Ham and cottage cheese crescent rolls
Mini Pizzetta
INGREDIENTS
- 4 cups flour (500 g)
- 2 ¼ tsp active dry yeast (7 g)
- 1,5 cup warm water (3,5 dcl)
- 2 tbsp olive oil (30 ml)
- 1 tsp sugar (4 g)
- 1 tsp salt (5,7 g)
- 1,2 cups mozarella cheese
- ½ cup cheese of choice
- ½ cup tomato sauce
- ¼ cup sour cream
- ½ cup diced bacon
- 1 onion
- 1 tomato
- 1 small zucchini
- 3 cloves garlic
- 4 olives
INSTRUCTIONS
- In a big bowl mix together dry ingredients (flour, dry yeast, salt and sugar). Add warm water together with 2 tbsp of olive oil. Stir well, until you get wet and sticky dough.
- Sprinkle a clean surface on a kitchen counter with flour. Reload the dough on the flour and knead it for at least 10 minutes. Lift the dough and clap it against the surface several times. Repeat until you get a less sticky, soft and stretchy ball of dough.
- Sprinkle the bowl with additional flour, place the dough inside and cover it with a kitchen cloth. Let it rest for an hour at room temperature until it doubles in size. If possible, let the dough rise overnight in the refrigerator.
- Preheat the oven to 450°F/230°C. In the meantime, prepare the toppings. Add a little bit of salt, garlic and oregano to tomato sauce. Shred the cheese and slice the vegetables. If preparing mini pizzette with zucchini, quickly fry the zucchini slices on hot olive oil.
- When the dough has risen, gently knead it on a flour-sprinkled surface, split it into 9-12 equal pieces and form small balls.
- Using a rolling pin or hands, press the balls to the surface to form round pathche, about 10 cm in diameter.
- Transfer the dough patches to a baking sheet that you've previously covered with parchment paper and sprinkled with olive oil. Cover the baking sheet again and let the dough rest for another 15 minutes.
- Top the dough patches with olive oil using a kitchen brush. Press down the middle of each mini pizzetta with a glass, while turning the glass gently in circles.
- First top the middle of each mini pizzetta with the sauce and then add the toppings you've prepared in advance. Add cheese and mozarella, top it with other ingredients and again finish it with a sprinkle of shredded mozzarella cheese.
- Bake at 230 °C/450 F for about 15 minutes. Each mini pizzetta crust should look golden and crunchy and the cheese should be completely melted.
- Let mini pizzette cool down for a minute or two, then serve while they are still hot and enjoy 🙂
NOTES
- For the best dough, choose quality flour and let it rise overnight in the refrigerator.
- Use wholemeal flour for a healthier version of mini pizzette.
- For a tasty and crispy crust, add olive oil to the dough.
- Check mini pizzette often while baking; because they are smaller, they will need less time and slightly lower temperatures than a regular pizza to bake.
- Before storing, let the baked mini pizzette cool down to avoid condensation from forming.
- Divide each mini pizzetta with parchment paper, wax paper or paper towels to separate them while stored in the same container.
- The best way to prepare mini pizzette in advance is to freeze the dough. Prepare the dough and freeze the dough balls separately.
NUTRITION
Featured on Full Plate Thursday at Miz Helen’s country cottage
Featured at Fiesta Friday
If you liked this mini pizzetta recipe, please rate it in the comments below.
Show your love by sharing ❤️
Gorgeous looking little pizzas 😊 I bet they taste even better than they look 😋
Thank you 😊
This would be so much fun for when the grand kids are over. I think they would have a ball filling their own pizzettes!
Definetly, let me know if you need any help 🙂 For small kids with smaller hands you can make more dough balls and let them make their own mini mini pizzas 🙂
What a wonderful idea! I just got some toppings for homemade pizza’s too! I’ll have to give this a try. Pinning this for later.
These have my name written all over them- yum! Thanks for sharing 🙂
Thanks Holly, I hope you’ll enjoy them 🙂
Mariama these look soooo good! We do pizza night every Friday and my boys would love these! I’d love to invite you to come share your recipe over at my weekly link party!
https://www.ourtinynest.com/2023/06/28/weekly-link-party-354/
Hope you have a great rest of your week!
Thank you Nicolle, my pleasure 🙂
Super duper delicious, pinned it for sure.
Thank you from your SSPS Team and Esme for sharing your various links with us at #267 SSPS Linky.
Thank you Esme 🙂
These are so cute, I love them! Great for parties and a treat night, I definitely need to make these! Sim x Hopping over from UnlimitedLinkParty
Thank you, hope you give them a try!
Now I want pizza – mini or otherwise!
I no longer eat pizza but these certainly look cute and delicious.
Thanks Sherry 🙂
It has been yers since I made our pizzas. The grandkis are coiming for a a long weekend. This will be fun for us to make togther! Thanks for the inspiration
Hope you’ll like them!
Thanks so much for sharing your awesome post with us on Full Plate Thursday, 648! We have featured your post this week and sure hope will be come back again soon!
Miz Helen
Awwwwwww, Miz Helen, you just made my day:) It’s been such a pleasure being a part of Full Plate Thursdays and surely we’ll be back soon 🙂
What a fun idea!! Pinned – Thanks for sharing at the What’s for Dinner party – hope to see you again this Sunday!!
Thank you Helen, we’ll be happy to be there 🙂
Love this idea! And they look delicious.
Thanks 🙂
These sound wonderful! Oh boy, me and homemade dough have a love hate relationship, basically I stink at making homemade dough. Lol.
Thank you bunches for sharing this recipe with Sweet Tea & Friends this month dear friend.
It’s been such a nice pleasure Paula, Sweet Tea & Friends is so adorable. And please give these mini pizzette a try, it’s all just about kneading the dough well and giving it enough time to rest.
Love this cute little pizza with various topping. Thanks for sharing..
These look and sound so good. I think they would be great for the kids as a snack or fantastic for a dinner party. x
Thanks Kim, hope you do give them a try.
These mini pizzas look amazing! We love a nice pizza night! Thanks for sharing your recipe. 🙂
Thanks Stephanie, hope you’ll like them!